Live Class Scheduling and its Features
Introduction
The SNSI Virtual Classroom (VC) lets you deliver live and engaging from one-to-one to one-to-ten sessions. The SNSI VC is based on the WebRTC (Web Real Time Communications) technology that does not require you or your learners to install any additional plugins to launch or access the VC respectively. In the VC, you can easily communicate with your learners through the built-in communication tools – audio, video, and chat. Further, you can also share any file or presentation, play a YouTube video directly from the VC, or use the whiteboard to explain any concepts.
System Requirements
Hardware requirements

Internet Speed Requirements
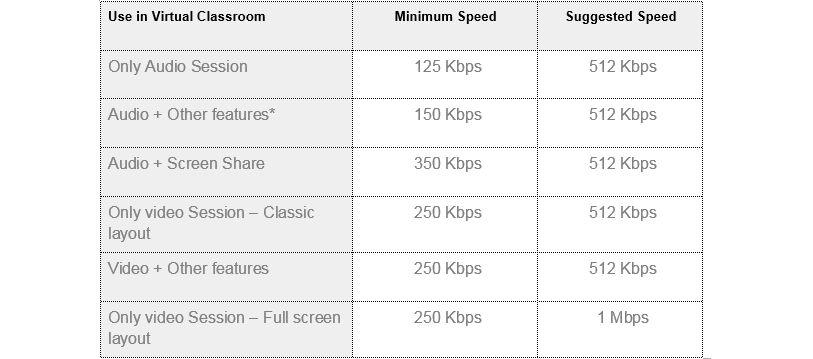
Since conducting a live class with audio and video enabled consumes a lot of your network bandwidth, therefore, the SNSI VC first ensures that your and your learners’ devices are compatible and efficient enough to support high quality audio and video content.
Virtual Classroom Interface
The SNSI VC interface is user-friendly, has a rich set of functionalities, and contains various intuitive navigation elements. The VC interface is broadly organized into the following three sections as shown below:
Internet Speed Requirements
Since conducting a live class with audio and video enabled consumes a lot of your network bandwidth, therefore, the SNSI VC first ensures that your and your learners’ devices are compatible and efficient enough to support high quality audio and video content.

Features of the SNSI Virtual Classroom
The SNSI VC supports the following features:
-
Real-time, audio video streaming
Facilitates in simulating a conventional classroom environment through the high-quality audio-video feature. You can also enable the audio-video control for your learners, and conduct face-to-face classes. By default, SD (640p) live video streaming is available. -
Server-side recording
Performs real-time audio and video recording in the background when instructors are livestreaming their classes. This feature enables the instructors to create a recording of all the activities they perform on the SNSI VC screen. The instructors can share the recordings with their learners or save them for future use. By default, all recordings are available in SD(640p). -
Advanced interactive and feature-rich whiteboard
Offers multiple options to the instructors to draw, illustrate, show diagrams, upload presentations, images, or even play videos from their libraries without any hassles. Further, the whiteboard helps instructors annotate any images, or illustrate and comment on an existing file or image. The whiteboard also offers a full-screen mode to provide instructors with a bigger workspace. Additionally, the instructors can save a specific or all whiteboards they use in a live class as a PDF. -
Advanced collaboration and moderation, and high learner engagement
Provides several option for the seamless replication of conventional classroom environments -transferable writing and audio-video controls; real-time peer-to-peer or peer-to-instructor public and private text-based interaction; live polling. Such options ensure frequent learner engagement and help instructors get instant feedback from the learners. -
Live screen and application sharing
Facilitates the instructors to share their device screens on the whiteboard interface with the learners. This feature also lets the instructors to enable the screen share option for learners and offer them any remote assistance. Additionally, the application sharing feature lets instructors share any application, such as PPT or Excel with the learners. -
Integrated content library and content sharing
SNSI upload, organize, and store course content in the cloud and you can access the content from anywhere at anytime. The integrated library supports all types of files, and saves you the hassle of transferring and carrying data. Also, it is easy to search for any content and share it with your learners. All the content resource in the library can be reuse for different classes and courses. -
Live classes on-the-go
Offers the flexibility to learners to attend live classes on-the-go using the WizIQ Android and iOS apps.
Virtual Classroom Interface
The SNSI VC interface is user-friendly, has a rich set of functionalities, and contains various intuitive navigation elements. The VC interface is broadly organized into the following three sections as shown below:
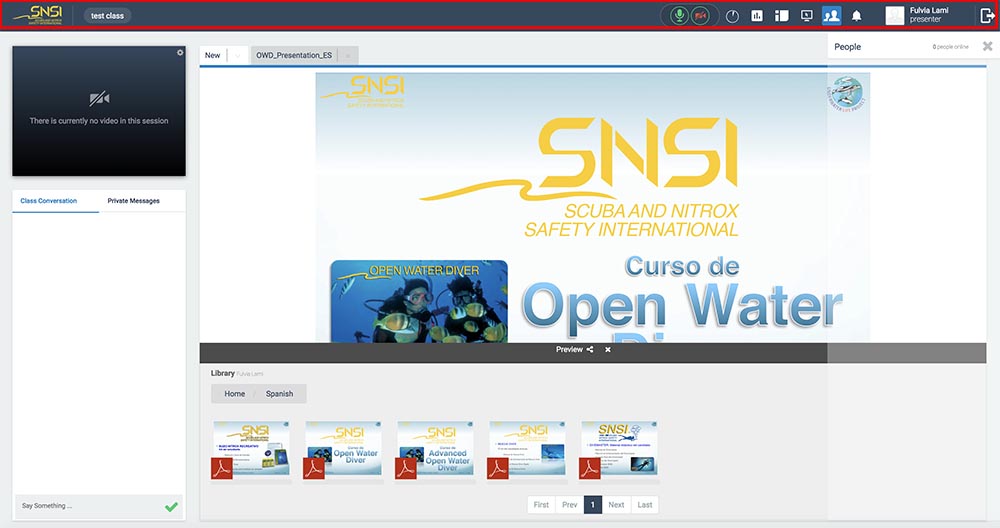
VC header: Displays the name of live class, audio-video enabling and recording options, and options to perform tasks – setting the class end time, conducting a poll, switching layout, sharing screen, viewing the attendees, viewing notifications, and signing out. The various elements displayed in the VC header are as follows:
o Live class name: Displays the name of your live class (test class in the image).
o Recording and audio video controls: Displays options to record the live class, or toggle between enabling/disabling audio and video.
o Timer: Displays time remaining until your live class gets over. The timer also displays the option to extend your live class or end the class.
Remember: You cannot extend a live class beyond 300 minutes.
o Polling: Lets you conduct a live poll while the class is underway. You can also create a poll and get feedback after the class is over.
o Layout Change: Enables you to switch between different views during a live class with your learners. The available views include:
Default View: Displays your video and chat window on the left along with the instructor workspace on the right.
Vertical View: Displays an enlarged instructor workspace while the video and chat window are hidden.
Horizontal View: Displays your video in the full-screen mode.
Tile View: Displays your video along with the video of your learners in the form of tiles.
o Screenshare: Enables you to share your device or application screen with the learners.
o People: Shows the list of attendees in the live class. It also provides you the options to transfer the audio and video controls to a specific learner.
o Notifications: Displays notifications pertaining to the live class. For example, if the learners raise their hands, you can see them in the notifications.
o Presenter details: Displays your name.
o Signout: Lets you sign out of the live class.
● Communication pane: Displays your video and chat window that lets you interact with your learners. Additionally, the Private Messages tab in the chat window facilitates private interaction on a one-to-one basis with your learners.
● Instructor workspace: Refers to the various elements integrated into the VC that facilitate you in delivering engaging classes. These options include the following:
The instructor workspace has a tabbed view structure wherein each element that you select opens in a new tab within the workspace.
o Youtube: Lets you plays YouTube videos directly without requiring to leave the classroom.
To enable this option:
1. In the teaching area, select New > Youtube.
2. In the Youtube tab that opens, enter the URL of the video you want to play and click . The video in the specified URL starts playing.
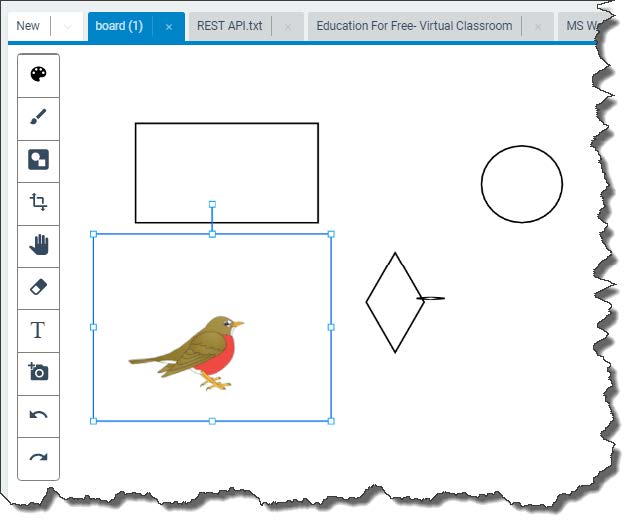
o Whiteboard: Acts like a digital canvas on which you can write, sketch, insert various shapes, and add an image and annotate it, among others. The whiteboard interface is clean and simple, and contains a vertical toolbox that provides you options, such as pen, highlighter, shapes, pointer, text, undo, and redo, among others.
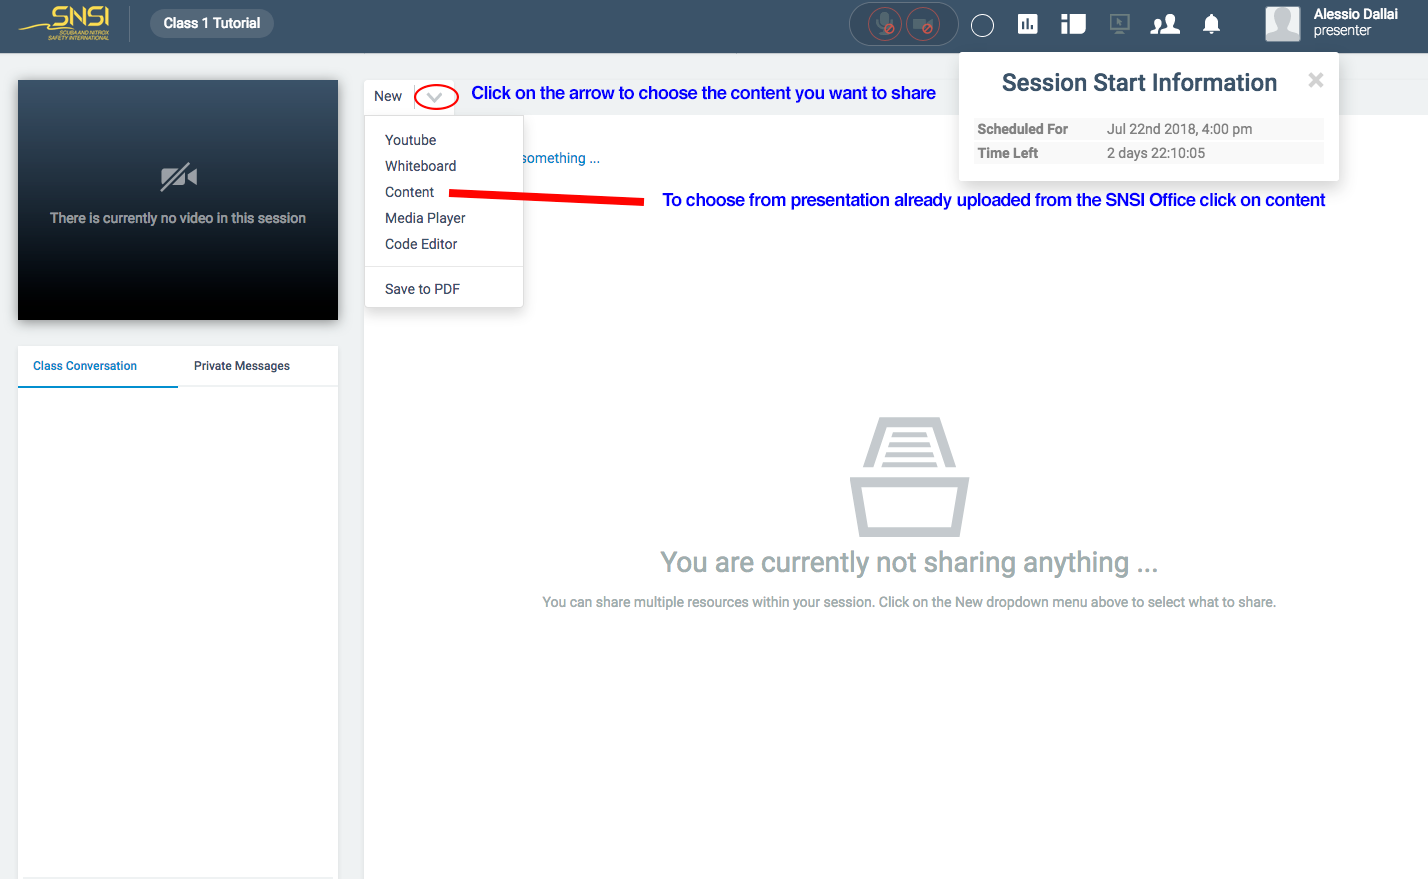
o Content: Lets you share the files available in your content library with the learners. You can also share any content on your computer using the Choose a File option.
o Media Player: Displays the audio or video file available in your library and plays the selected file.
CLASS SCHEDULING, SHARE AND LAUNCH
The first step to schedule a class is to create the course inside your MySNSI. Once logged in you have to click on “Webteaching” menu link. A new panel will open in your browser (You need to allow PopUps). If you see only a black page this means that you did not allow PoUps on the browser, Look at the right side of the URL bar of your browser and you will see a red cross or an advise (depending on the browser you are using) click on the advise and allow PopUps.
Once you have allowed PopUps you will see a page like the image below:
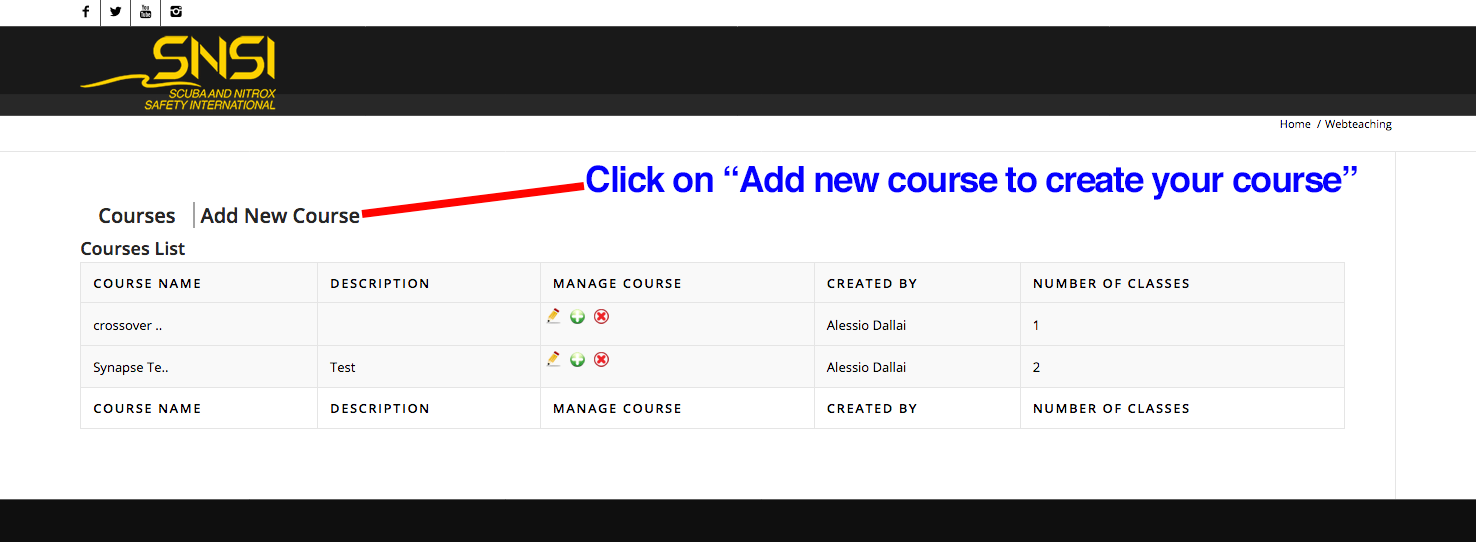
Once you have clicked on “Add New Course” you will be prompted to a page like the image below. Complete the form and make sure to press save.
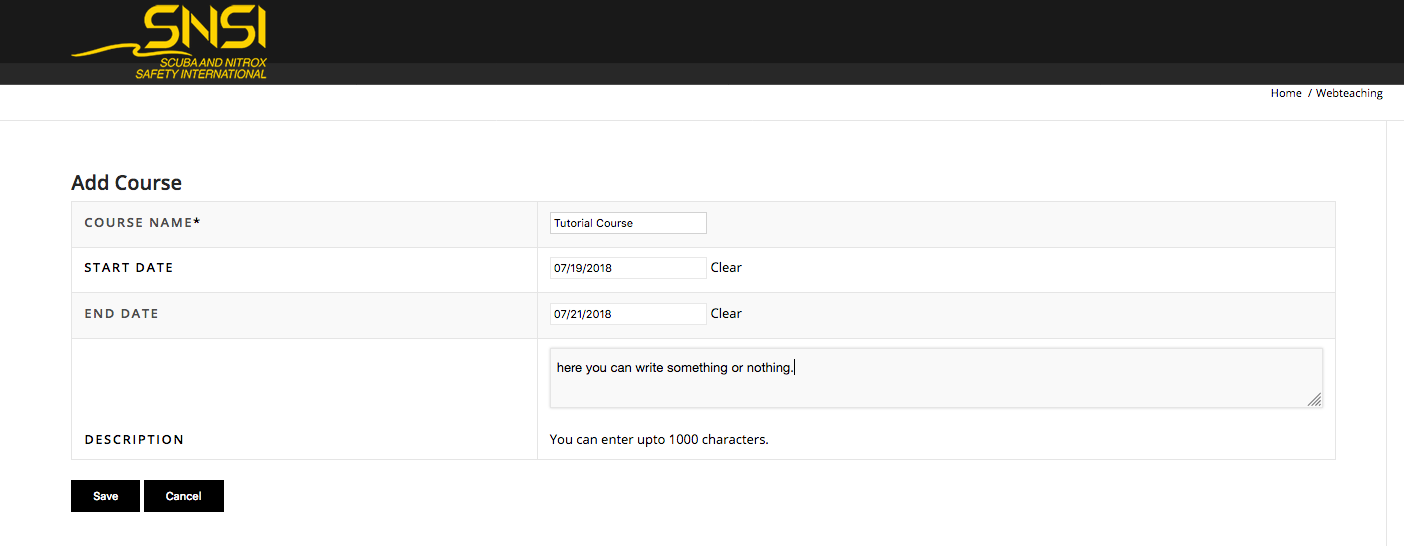
Once you have saved it you will see the course in your page like the image below and here is where you can add your class:

To Add the class you will need to fill out the Class form and press the button “Schedule and Continue”:
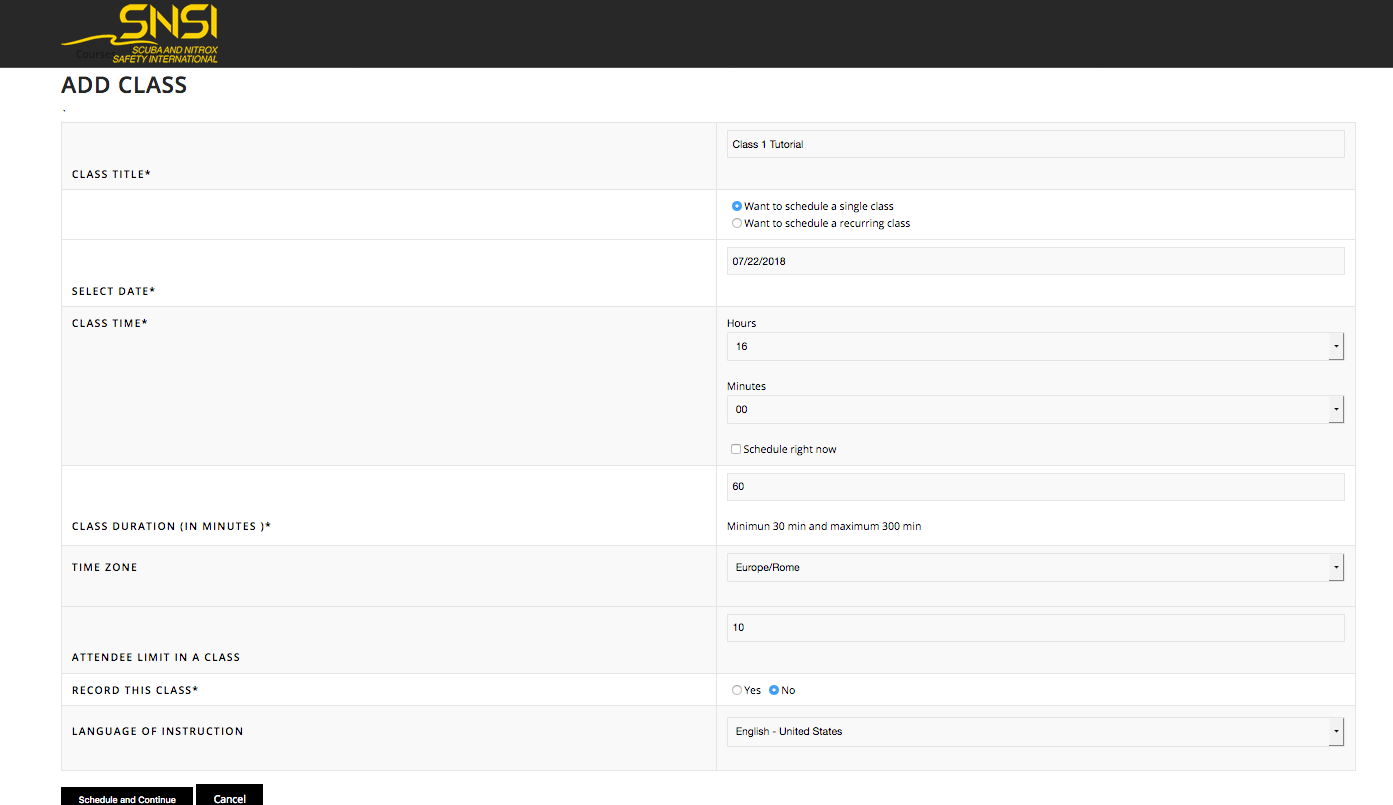
Once you have clicked on “schedule and continue” you will see the following:
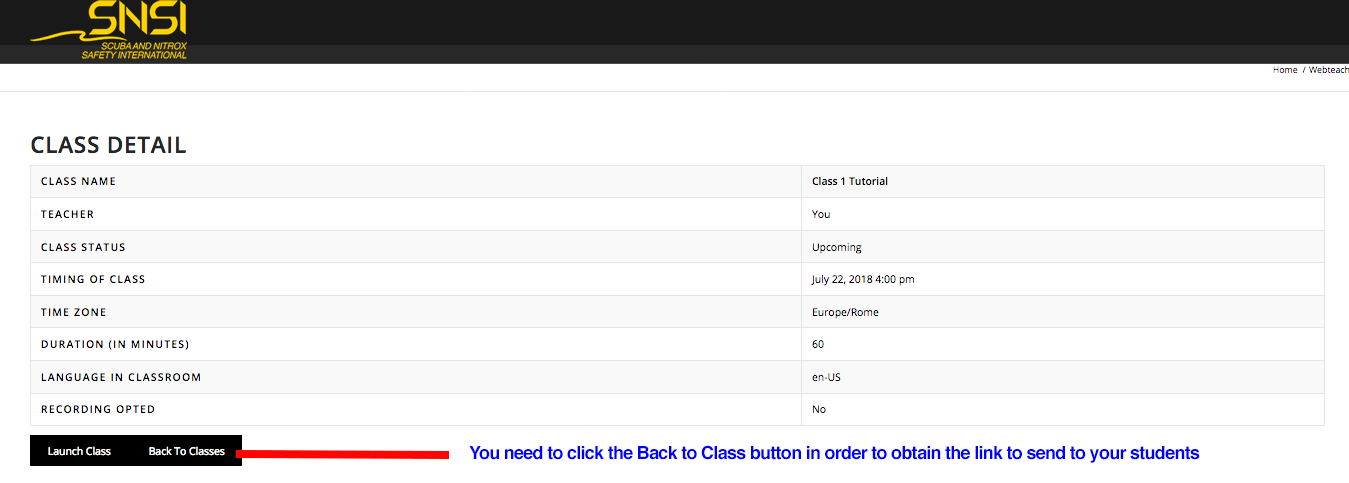
NOTE: here the main difference with the old system. To share the class link with students you have to do the following steps:
- Once the Button “Back To Classes” is pressed you’ll be prompted to the page below:

When you click on the eye icon you will be prompted to a new panel as follow:

Click on the share button and to obtain the link for your students.
THE PURPOSE OF THIS PAGE IS ONLY TO OBTAIN THE LINK. DO NOT LAUNCH THE CLASS FROM HERE.
From here please only do the following:
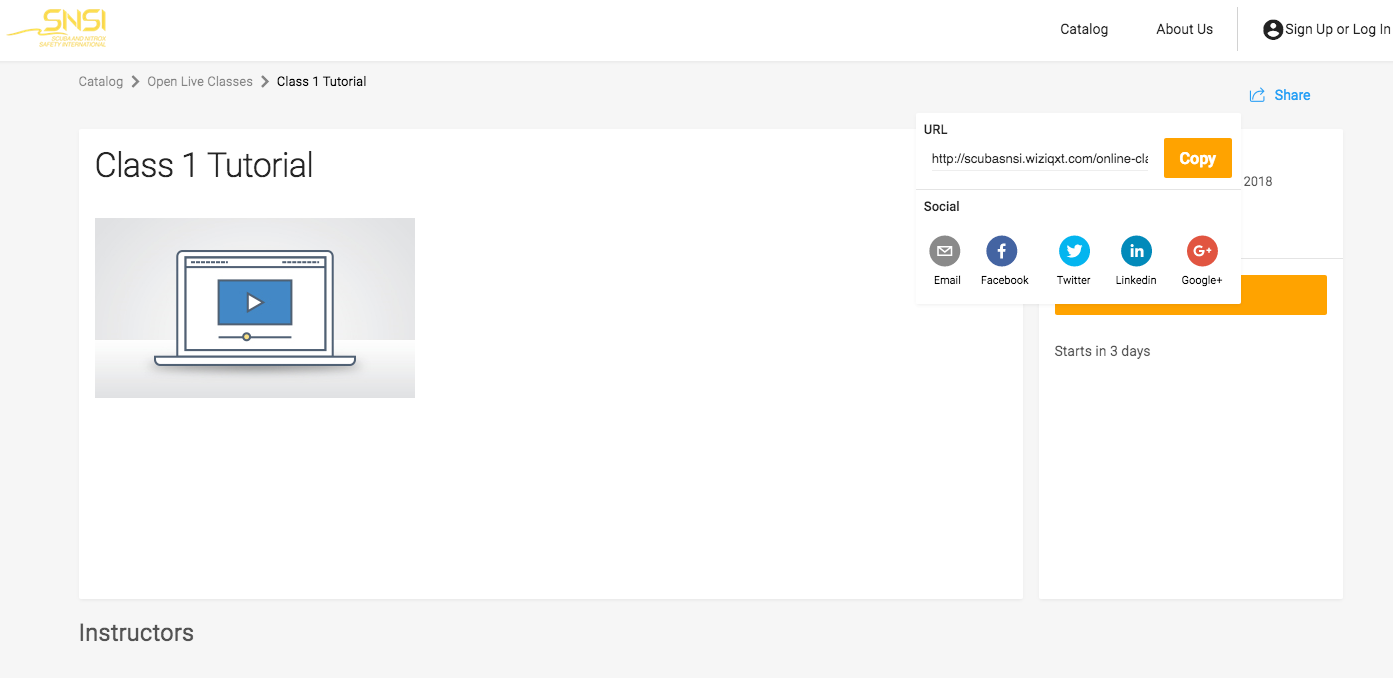
Once you have obtained the link close this panel.
When you close the panel you will see again the page below, Click on the Class title to go to where you will launch the class as the instructor:

You will be prompt to this page where you can launch your class as Instructor.
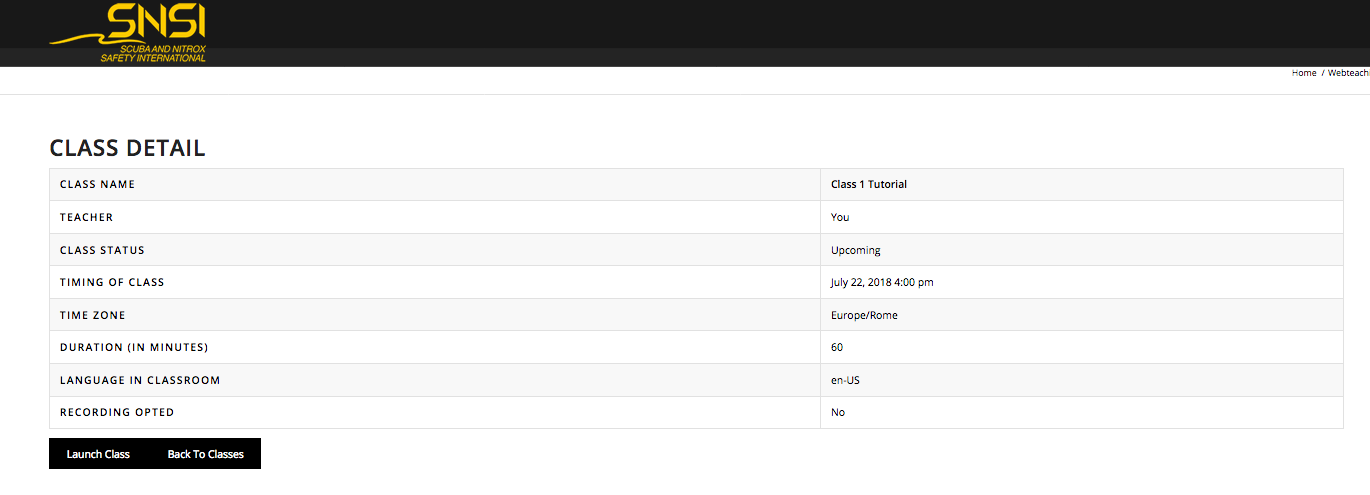
Press on launch class and the new class will be launched.
The NextGen SNSI VC will appear and here you will prepare your class. It is always recomended to enter the class half an hour before the starting time so you can prepare all your staff before your students enter the class. Remember you can have one class with a maximum of 10 attendees at a time.
Read More Professional Tutorial SNSI
